A handful of valuable tips and techniques in sketching can yield satisfying outcomes in your sketchbook. Whether you’re a novice navigating the challenge of beginning or an experienced artist seeking fresh ideas, our compilation of sketching tips below offers something for everyone.
Embarking on sketching can be daunting for beginners, as the blank page poses its own set of challenges. Even seasoned artists may find themselves in search of new inspiration. To address these needs, we’ve gathered insights from proficient artists to provide a diverse range of sketching tips.
Our assortment of advice spans everything from selecting pencils to mastering shading, refining silhouettes, handling smudging, and more. Beyond the technical aspects of sketching, we’ve also incorporated tips on finding inspiration, recognizing that this can be a formidable hurdle. In essence, we aim to offer a variety of tips to assist individuals at every stage of their sketching journeys.
1. Understand your Pencils
Choosing the right pencil is a fundamental sketching tip that significantly influences the outcome of your pencil sketch. The graphite’s hardness is clearly indicated on the pencil’s side, with ‘B’ pencils being softer, ‘H’ pencils being harder, and ‘HB’ pencils falling in the middle. There’s a notable distinction between a 4H and a 4B. Tim Von Rueden, a convention artist, recommends initiating the sketching process with a foundation on the H scale and then incorporating the darker B scale for finishing touches.
In the realm of learning how to draw, it’s beneficial to explore the use of mechanical pencils in conjunction with traditional ones. According to Von Rueden, mechanical pencils excel in precision, while traditional pencils are ideal for covering expansive areas with texture. It’s worth noting that most mechanical pencils come pre-inserted with an HB lead, limiting you to the middle range, so keep this in mind when considering your drawing tools.
2. Gain Mastery Over Your Pencil
Illustrator Sylwia Bomba advises, “Adjusting your hand closer to the pencil’s end provides greater control and precision, resulting in heavier strokes or darker markings. On the other hand, holding the pencil further up diminishes control and precision but produces lighter strokes or markings.” This emphasizes the importance of understanding how hand placement influences the outcome of your pencil strokes, allowing artists to tailor their approach based on the desired effect in their sketches.
3. Experiment with Various Techniques for Mark-Making
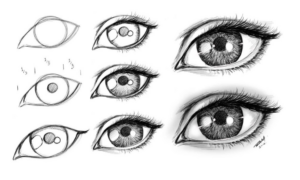
Numerous sketching tips and techniques exist to assist you in attaining diverse styles and effects. The examples above showcase various methods for achieving form and depth. According to Von Rueden, it’s crucial to engage in experimentation to discover what suits your preferences and enhances your unique style. While he favors smooth value transitions with pencil strokes seamlessly blending against a delicate outline, others might find a preference for cross-hatching juxtaposed against a bold outline. This underlines the importance of personal exploration to refine one’s individual sketching approach.
4. Diversify Your Line Work
Illustrator Rovina Cai emphasizes the importance of employing diverse lines. She advises, “Lines are not uniform. Minor adjustments in line width and darkness contribute to a dynamic and visually compelling drawing. While mastering the control of the marks you make may be challenging initially, practice will enable you to produce a range of marks that harmonize to form a unified image. Experiment with various pencil grades, ranging from 3H to 6B, and explore holding the pencil at different angles to further diversify your line work.” This underscores the idea that the deliberate use of varied lines can greatly enhance the intricacy and visual appeal of your drawings.
5. Minimize Smudging
“When shading, place an additional sheet of paper beneath your hand,” suggests artist Brun Croes. “This will reduce the risk of your hand smudging the pencil lines. For right-handed individuals, initiate shading from left to right; for left-handed individuals, begin from the right and move towards the left.
“Nothing is more disheartening than working on a meticulously crafted drawing that loses its brilliance and value due to smudging. Instead, leverage smudging strategically to smooth out shading when needed. Various tools can aid in this process, and personally, I find a simple piece of tissue paper effective for achieving the desired results.” This highlights the importance of managing smudging to maintain the cleanliness and quality of your drawings while using it selectively for specific artistic effects.
6. Control your edges
Von Rueden employs four distinct sketching methods to articulate object edges: thin, hard, lost, and undefined. Thin and hard edges provide objects with well-defined and solid borders. Lost edges come into play when the values of the object and background seamlessly merge, implying the edge rather than explicitly defining it. Undefined edges require viewers to interpret and discern. He recommends experimenting with all four types and integrating them harmoniously to introduce intrigue and complexity into your artwork. This underscores the importance of thoughtful edge control in sketching to convey different visual effects and engage the viewer’s interpretation.
7. Use a Blending Stick for Seamless Shading
Achieving smooth and blended effects with pencils, such as capturing a sky, is feasible. According to artist Marisa Lewis, there are instances where it’s preferable for shading to be less sketchy and more refined. She notes that pencil lines may not blend seamlessly unless approached with great care.
To overcome the issue of initial scribbles showing through, Lewis employs a specific technique. She suggests doodling a sizable area of soft graphite or charcoal pencil on spare paper, then using a large blending stick to gather the soft dust for application in the image. Continuously utilize the blending stick, incorporating additional scribbles as needed to accumulate more graphite. This method allows for the gradual buildup of darker areas, contributing to the creation of defined and nuanced shading in your artwork. This technique is a valuable addition to an artist’s repertoire for achieving smooth and subtle shading effects.
8. Implement the 70/30 Guideline in Your Sketching
Embracing the principle of simplicity is a key sketching tip—sometimes, less is more! The 70/30 rule serves as a valuable guideline for crafting impactful compositions. The concept revolves around allocating 30 percent of your sketch to the main focus and intricate details, while the remaining 70 percent is dedicated to filler. This less visually stimulating area serves the purpose of directing attention towards the central subject of your artwork. Observing this rule in practice can be witnessed in Von Rueden’s showcased sketch. This underlines the significance of thoughtful composition in sketching, emphasizing the art of balance in allocating visual weight to different elements within the artwork.
9. Make your sketches (almost) symmetrical
“I appreciate symmetrical drawings, but they can become monotonous quite rapidly,” notes Croes. “To counter this, introduce subtle variations and maintain symmetry in the overall lines instead of mirroring every minute detail. Preserving asymmetry in certain elements serves as a remedy to prevent tedious repetition.” This advice underscores the idea that injecting slight asymmetry into an otherwise symmetrical sketch adds visual interest and prevents the artwork from appearing overly uniform or predictable.
10. Distinguish Varied Textures
To convey diverse textures in your sketch, it’s crucial to adapt your technique. According to Von Rueden, shading skin should differ from shading metallic surfaces or fur, considering the distinctive properties each texture possesses. Achieving accuracy in depicting these textures enhances the quality of your drawings.
A helpful starting point involves evaluating whether the texture is rough or smooth, and then determining if it absorbs or reflects light. Von Rueden further explains that a reflective and smooth texture, such as chrome, typically exhibits higher contrasts and pronounced highlights, while an absorbent and rough texture like cotton tends to have lower contrasts and minimal to no prominent highlights. This emphasizes the importance of tailoring your shading approach to the specific characteristics of different textures in order to achieve a more realistic and visually compelling result in your sketches.


