Art has been a mirror to human life and emotion for centuries, capturing the essence of our existence in various forms. Among these, the art of pencil portrait drawing stands as a timeless tradition that embodies the pursuit of realism, the faithful representation of subjects in all their intricate detail. Pencil portraiture is an exquisite art form that demands not only skilled hands but also a deep understanding of human anatomy, a profound appreciation of light and shadow, and an unwavering commitment to precision.
In this journey into the realm of realism, we will explore the captivating world of lifelike pencil portraits. This art form, which has fascinated and inspired artists and art enthusiasts alike for generations, transcends mere drawing. It is a language that communicates the very soul of its subjects, portraying the depth of human emotions, the intricacies of physical features, and the nuances of expression in a way that no other medium can replicate.
Creating a lifelike pencil portrait is an endeavor that requires patience, precision, and an unwavering dedication to mastering the art of representation. It is a process that begins with the careful selection of materials and culminates in the creation of a piece of art that appears to breathe life onto the paper. Throughout this exploration, we will delve into the essential techniques, step-by-step processes, and invaluable tips that will help you bring a piece of your subject’s world onto a blank canvas.
As we embark on this artistic journey, we will discover the fundamental aspects that underpin the creation of a realistic pencil portrait. We will delve into the significance of choosing the right materials, understanding the interplay of light and shadow, capturing accurate proportions and features, mastering the art of gradation and value, and infusing lifelike textures into our artwork. Through this, we will unlock the secrets to turning simple strokes of graphite into portraits that seem to leap off the page.
Whether you are a seasoned artist looking to refine your skills or a novice eager to embrace the world of pencil portraiture, this exploration into realism will provide you with the tools and knowledge needed to create breathtaking works of art. You will not only learn the technical aspects but also gain a deeper appreciation for the art form itself and the unspoken stories it can tell.
Join us in this artistic odyssey as we venture into the world of realism and discover the art of creating lifelike pencil portraits. It is a journey that promises to be both challenging and immensely rewarding, as we endeavor to capture the essence of our subjects and breathe life into our art, one stroke at a time.
The Essentials of Realistic Pencil Portraits
1. Materials
Creating a lifelike pencil portrait that captures the essence of your subject is a meticulous endeavor, and the choice of materials plays a crucial role in achieving the desired result. The right selection of materials can make the difference between a successful, realistic portrait and one that falls short. In this section, we will explore the essential materials you need to embark on your journey into the world of lifelike pencil portraits.
1. High-Quality Drawing Paper:
The foundation of any pencil portrait is the paper upon which it is created. High-quality drawing paper is a must for achieving the best results. Look for heavyweight paper with a smooth or medium texture, which can handle multiple layers of graphite or charcoal without smudging or tearing. The weight of the paper is typically measured in pounds (lb) or grams per square meter (gsm), and a heavier weight paper (around 100lb or 150gsm) is ideal for pencil portraits.
2. Graphite Pencils:
Graphite pencils are the primary tools for rendering pencil portraits. To create realistic shading and detailing, you’ll need a range of pencils with varying degrees of hardness. The hardness of a pencil is indicated by a combination of letters and numbers, with ‘H’ pencils being harder and ‘B’ pencils being softer. A typical set may include pencils ranging from 9H (the hardest) to 9B (the softest). These pencils allow you to control the intensity and depth of your shading.
- H Pencils: These are ideal for fine lines and initial sketching. The harder lead leaves lighter marks and is easier to erase.
- B Pencils: These are softer and are used for darker shading. They allow for rich blacks and smooth transitions between shades.
3. Erasers:
Erasers are essential for correcting mistakes and creating highlights in your portrait. Two types of erasers are particularly useful for pencil portraits:
- Kneaded Eraser: This putty-like eraser can be shaped to a fine point and gently lifted off the paper, making it excellent for precision erasing and creating soft highlights.
- Gum Eraser: A standard gum eraser is more abrasive and can be used for heavier erasing. It’s particularly useful when you need to remove graphite over larger areas.
4. Blending Tools:
Blending tools are essential for achieving smooth transitions between different shades of graphite. They help eliminate harsh lines and create a realistic, soft look. Common blending tools include:
- Paper Stumps: These cylindrical tools made of tightly rolled paper are great for blending and smudging graphite.
- Tortillons: Tortillons are similar to paper stumps but are made of rolled paper. They come in various sizes for different blending needs.
- Fingers: Your fingers can also be effective blending tools, especially when you need to smudge larger areas.
5. Drawing Board or Easel:
A drawing board or easel helps provide a stable surface for your artwork and prevents the paper from moving or wrinkling during the drawing process. It also allows you to maintain a consistent viewing angle for accurate rendering.
6. Fixative Spray:
To protect your finished artwork from smudging, especially in darker areas where the graphite may be more prone to smearing, you can use a fixative spray. This clear, matte spray seals the drawing, keeping it in its original state.
Choosing the right materials is the first step in creating lifelike pencil portraits. Each element contributes to the overall quality and longevity of your artwork. By investing in high-quality materials and understanding their usage, you’ll be well-equipped to bring your artistic vision to life and embark on your journey into the captivating world of pencil portrait realism.
2. Understanding Light And Shadow
The mastery of light and shadow is at the heart of creating lifelike pencil portraits. The interplay of light and shadow defines the three-dimensionality of your subject and breathes life into your artwork. This fundamental understanding is essential for achieving realism in your drawings. In this section, we will explore the principles of light and shadow, how they affect your pencil portraits, and how to utilize them effectively.
The Significance of Light:
Light is the essence of visual art. It illuminates the subject, revealing its form and texture. In pencil portraits, the source and direction of light are crucial considerations. Here’s what you need to understand:
- Light Source: Identify the primary source of light in your reference image. Is it natural light from a window, soft diffused light, or strong directional light from a lamp or spotlight? Understanding the source helps determine where the light will hit your subject and where shadows will form.
- Direction of Light: Observe how the light falls on your subject. Is it coming from the left, right, above, or below? This affects the placement and shape of shadows on the subject’s features.
- Intensity of Light: The intensity of the light source affects the contrast between light and shadow. Strong light creates sharper, darker shadows, while soft light results in gentler transitions.
The Role of Shadow:
Shadows in a pencil portrait provide depth, dimension, and definition. They are not just dark areas but important elements that give your subject form. Consider the following:
- Cast Shadows: These are the shadows that your subject casts onto the surrounding surfaces. The shape and direction of cast shadows depend on the subject’s form and the angle of the light source.
- Core Shadows: Core shadows are the darkest areas on the subject’s surface, typically found where the light doesn’t reach directly. They define the contours of features and add depth.
- Reflected Light: In some cases, you may notice areas of the subject that appear to be in shadow but are not completely dark. This is due to reflected light bouncing off nearby surfaces and subtly illuminating shadowed areas.
Applying Light and Shadow in Pencil Portraits:
To create realistic pencil portraits, it’s essential to translate your understanding of light and shadow into your artwork. Here’s how to apply this knowledge effectively:
- Start with a Light Base: Begin your portrait by lightly shading the entire face with a pencil. This establishes a base upon which you can build up the shadows.
- Observe and Replicate: Carefully observe your reference image and replicate the direction and intensity of light in your drawing. Pay attention to the location of highlights and shadows on facial features.
- Gradual Shading: Begin shading features gently, building up layers to create smooth gradations. Use harder pencils (H) for lighter areas and softer pencils (B) for darker shadows.
- Blending and Smudging: Blending tools, like paper stumps or tortillons, help you create smooth transitions between light and shadow. Use them to smudge the graphite for a more realistic effect.
- Create Sharp Contrasts: For dramatic lighting, create sharp contrasts between light and shadow. Pay close attention to the edges where light meets shadow to define your subject’s features.
- Highlight Placement: To make your drawing come alive, add highlights where the light hits the subject. You can use an eraser to gently lift off graphite to create these highlights.
Understanding the principles of light and shadow and applying them effectively in your pencil portraits will enable you to capture the three-dimensional aspects of your subject. This skill is integral to achieving realism and breathing life into your art. As you practice and refine your technique, you’ll develop a keen eye for how light interacts with your subjects, resulting in truly lifelike and captivating pencil portraits.
3. Capturing Proportions And Features
One of the core challenges in creating lifelike pencil portraits is accurately capturing the proportions and features of your subject. Achieving a true likeness relies on the precise representation of facial and anatomical details. In this section, we’ll explore the importance of capturing proportions and features and provide you with essential tips to excel in this aspect of realistic portrait drawing.
The Significance of Proportions:
Proportions are the foundation of any pencil portrait. Accurate proportions ensure that the subject’s face is correctly represented and that all features are in harmony. Here’s why proportions are so vital:
- Recognizability: Accurate proportions are the key to making your portrait immediately recognizable. Even slight deviations can affect the likeness.
- Anatomical Realism: Correct proportions are necessary for capturing the subject’s anatomy faithfully. A well-proportioned face looks more natural and lifelike.
Tips for Capturing Proportions:
- Start with an Outline: Before diving into details, begin with a light outline of the head and face. This serves as a roadmap for proper feature placement and overall proportions.
- Identify Key Reference Points: Take note of key reference points on the face, such as the center of the eyes, the midpoint between the eyes and chin, and the placement of the ears. These serve as crucial guides.
- Measurements and Comparisons: Use your pencil to measure and compare distances between features. For example, you can measure the distance from the chin to the eyes and compare it to the distance from the eyes to the hairline.
- Maintain Symmetry: Ensure that the two halves of the face are symmetrical. Divide the face vertically and compare the features on each side for consistency.
The Art of Feature Details:
Pencil portraits are not merely about capturing overall proportions but also about rendering individual features with precision. Here are some insights into mastering facial features:
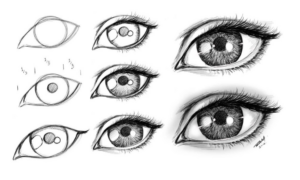
- Eyes:
- Start with the eyes, as they are often considered the focal point of a portrait.
- Pay attention to the size, shape, and placement of the eyes in relation to the rest of the face.
- Define the eyelids, lashes, and the pupils, which can convey a wealth of emotion.
- Nose:
- The nose varies widely among individuals, so study the reference image carefully.
- Observe the angle, length, and shape of the nose, as well as the nostrils and any distinctive features like a bump or flare.
- Mouth:
- The mouth plays a significant role in conveying emotion.
- Observe the width and shape of the lips, as well as any unique features such as dimples or creases.
- Consider the relationship between the mouth, nose, and chin for accurate positioning.
- Ears:
- Ears are often overlooked but contribute to the overall likeness.
- Observe their placement in relation to the eyes and nose, as well as their shape and size.
Tips for Feature Details:
- Use Guidelines: Lightly sketch horizontal and vertical guidelines to help position the features correctly. These guidelines can be erased later.
- Squint Technique: Squint your eyes when observing the reference image. This simplifies the details and helps you focus on larger shapes and proportions.
- Study Anatomy: Familiarize yourself with facial anatomy. Understanding the underlying structure of the face will help you render features realistically.
- Regular Comparisons: Continuously compare your drawing to the reference image to ensure accuracy.
Remember that capturing proportions and features is a skill that develops with practice. Even experienced artists often spend a significant amount of time on the preliminary sketch to ensure precise proportions. As you become more adept at capturing the essence of your subject through correct proportions and finely detailed features, you’ll witness your pencil portraits transform into lifelike and captivating representations of the individuals you seek to depict.
4. Gradation And Value
In the realm of pencil portraiture, mastering the art of gradation and value is crucial for creating lifelike, three-dimensional representations. The careful control of light and shadow, coupled with the precise manipulation of values, transforms a flat image into a captivating portrait that appears to leap off the page. In this section, we will delve into the significance of gradation and value in pencil portraits and provide you with essential tips for harnessing their power to enhance the realism of your art.
The Importance of Gradation and Value:
Value refers to the relative lightness or darkness of a color or tone. In pencil portraits, value is achieved through the manipulation of graphite shading, and gradation refers to the smooth transition of values across different areas of your drawing. Mastering this interplay is crucial for several reasons:
- Depth and Dimension: Accurate gradation and value control are essential for creating the illusion of depth and three-dimensionality in your portrait. They give the subject a rounded, realistic appearance.
- Realistic Shadows and Highlights: Proper gradation ensures that your shadows are not too harsh and that your highlights are not overly stark. Realism is often found in the subtleties of light and shadow.
- Texture and Surface: Gradation can convey the texture of skin, hair, and other elements within your portrait. It helps you transition from soft skin to the texture of clothing or the coarseness of hair seamlessly.
Tips for Achieving Effective Gradation and Value in Pencil Portraits:
- Begin Lightly: Start by lightly shading the entire portrait, creating a base layer of graphite. This will help establish the overall value scale.
- Controlled Strokes: Use controlled and deliberate pencil strokes to create gradual transitions between lighter and darker areas. Start with lighter strokes and increase pressure for darker regions.
- Varied Pencil Grades: Employ a range of pencil grades, from harder (H) to softer (B). Begin with harder pencils for the initial layers and build up to softer pencils for darker areas and fine details.
- Layering: Layering is a key technique in achieving smooth gradation. Add multiple layers of graphite in areas that require gradual shading to achieve the desired value.
- Blending Tools: Blending tools, such as paper stumps or tortillons, are invaluable for creating smooth transitions between values. Use them to smudge the graphite and create soft gradations.
- Erasers: Erasers can be used to lighten areas and create highlights by removing excess graphite gently. A kneaded eraser is excellent for precise highlights.
- Pay Attention to Reference Image: Continuously reference your source image to replicate the nuances of light and shadow accurately.
- Consider Background and Framing: Think about how the background and framing elements of your portrait contribute to the overall value composition. A neutral or subtle background can help emphasize the subject.
Experiment with Different Techniques:
Don’t hesitate to experiment with various techniques to achieve the perfect gradation and value for your specific subject. For instance, hatching (drawing parallel lines) and cross-hatching (drawing intersecting lines) are effective methods for creating texture and achieving gradation. You can also employ stippling, a technique using tiny dots, for detailed areas.
Remember that practice is essential for honing your skills in gradation and value control. The more you work on your pencil portraits, the more comfortable you’ll become with manipulating light and shadow to create realism. Over time, you’ll develop your unique style and refine your ability to bring depth, dimension, and emotion to your pencil portraits, making them truly lifelike and captivating.
Learn more about creating lifelike pencil portraits…
Explore Further:
If you’re eager to delve even deeper into the world of creating lifelike pencil portraits, you’re in luck. We have another blog dedicated to this fascinating art form, where we cover various aspects, from materials and proportions to light and shadow, and everything in between.
In our companion blog, “Mastering Lifelike Pencil Portraits: Techniques and Tips,” you’ll find a treasure trove of information to help you refine your skills and take your pencil portrait artistry to the next level. We discuss advanced techniques, unique approaches, and additional insights from experienced artists to guide you in your artistic journey.
So, whether you’re a budding artist or a seasoned pro seeking to enhance your abilities, be sure to explore our companion blog for a comprehensive and immersive experience in the world of lifelike pencil portraits. Your artistic voyage continues, and there’s always more to discover and create in the captivating realm of pencil portraiture.
Watch this tutorial to know more about creating lifelike pencil portraits:
Want to Draw More Realistic Portraits? TRY THIS – Colour Pencil Tutorial
Conclusion:
The art of creating lifelike pencil portraits is an awe-inspiring journey that transcends the confines of mere drawing. It is an exploration of the human essence, a voyage that challenges the artist to capture the subtleties and intricacies of the subject in the most authentic way. Throughout this exploration into realism, we’ve delved into the world of pencil portraiture, unraveling its secrets and revealing the techniques and practices required to breathe life into your artwork.
At the core of this journey, we’ve discovered the indispensable role that materials play in shaping the path to a realistic pencil portrait. Quality drawing paper, a diverse range of graphite pencils, erasers, blending tools, and even the choice of a drawing board or easel all converge to set the stage for your artistic expression. The right materials, chosen with care, become your allies in the quest to bring your subject to life.
Our voyage led us to the profound understanding of light and shadow, where we explored the nuances of how illumination interacts with your subject. Recognizing the source, direction, and intensity of light equips you with the power to transform your two-dimensional canvas into a realm of depth, contours, and texture. Light and shadow, the very essence of your subject’s existence, are harnessed to create the illusion of form and substance.
We ventured further into the realm of proportions and features, a realm where precision and accuracy reign supreme. The ability to accurately capture the subject’s facial proportions and details is the key to crafting a portrait that is not merely a representation but a striking reflection of the individual’s identity. Our exploration of this domain unveiled the significance of guidelines, measurements, and symmetry in the pursuit of artistic likeness.
Mastering the art of gradation and value marked a significant turning point in our journey, as we uncovered the secrets to breathing life into our portraits. Understanding how to create smooth transitions between light and shadow, utilizing varied pencil grades, and employing blending and erasing techniques all contribute to the dimension, texture, and realism of your artwork. Gradation and value control transform your flat surface into a captivating world of depth, emotion, and reality.
As we conclude this exploration, we are pleased to invite you to delve even deeper into the world of lifelike pencil portraits with our companion blog, “Mastering Lifelike Pencil Portraits: Techniques and Tips.” This additional resource offers a comprehensive look at advanced techniques, unique approaches, and expert insights to enrich your artistic prowess.
In the end, the creation of lifelike pencil portraits is a journey that fuses artistic skill with an understanding of the human spirit. It is an endeavor that combines materials, light, proportions, and gradation into a harmonious symphony of artistry. Whether you are a seasoned artist or an aspiring enthusiast, the path to realism in pencil portraits is an infinite, fascinating voyage, where every stroke brings you closer to capturing the essence of your subjects and breathing life into your art. As the journey continues, so too does your ability to create captivating, lifelike pencil portraits that stand as timeless testaments to the beauty of human expression.


