Drawing a dog can be a fun and rewarding experience, especially when broken down into easy steps. Whether you’re a beginner or looking to improve your drawing skills, following these simple instructions will help you create a basic yet cute dog illustration. Let’s get started!

Step 1: Draw the Head and Body
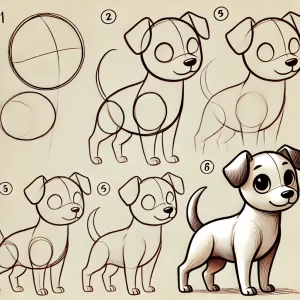
Start by sketching a circle for the dog’s head. You don’t have to worry about making it perfect. Below the head, draw a small oval shape for the body. The oval should be slightly larger than the circle and positioned lower, giving a rough idea of the dog’s proportions.
Make sure to draw light lines in this step because these will serve as guidelines for the final shape.
Step 2: Add Ears and Snout
Next, add two upright ears on top of the head. The ears can be simple triangles or rounded, depending on the breed of dog you’re drawing. After that, sketch a small snout area at the bottom of the head, creating the basic face shape.
Step 3: Draw the Legs and Paws
Now it’s time to add the legs. Draw four straight lines below the body, two in the front and two in the back. You can place small ovals at the ends of these lines to represent the paws. Keep the lines simple at this stage since we will refine them later.
Step 4: Sketch the Tail
For the tail, draw a curved line extending from the back of the body. This line can be short and upward if you want a perky tail or longer and curved down for a relaxed tail. The style of the tail also depends on the breed you’re aiming for.
Step 5: Refine the Body Shape
Now that we have a rough outline, it’s time to give the dog a more natural look. Refine the body shape by adding curves to the head, neck, and back. Smooth out the lines and make the dog’s body more rounded. This will help the dog look less like a series of shapes and more like a living creature.
Step 6: Add Facial Features
Let’s bring the dog to life by adding some facial features! Draw two round eyes on the head, near the snout. Add a nose in the center of the snout and a small mouth underneath. You can make the expression friendly by curving the mouth slightly upwards.
Step 7: Finalize the Outline
At this stage, go over your drawing with a darker line, refining the shapes and erasing the extra guidelines. Make sure the ears, body, and legs look proportional, and give the paws a more defined look. If you’re happy with the overall outline, move on to the final touches!
Step 8: Color Your Dog
Once you’ve completed the outline, it’s time to add some color! A common palette includes brown shades for the body, black for the nose, and perhaps white spots or patches for added detail. You can also experiment with different colors based on your preferred dog breed.
By following these simple steps, you’ll end up with a lovely dog drawing that you can be proud of. Drawing is all about practice, so feel free to try different poses, breeds, and styles to improve your skills over time. Happy drawing!


