Pencil drawing is a timeless and captivating art form that has been cherished for centuries, offering individuals a simple yet powerful means of self-expression. Whether you’re a novice artist taking your initial steps into the world of drawing or someone looking to refine your skills, understanding the common mistakes made by beginners and knowing how to rectify them is essential for your artistic growth.
The allure of pencil drawing lies in its accessibility. All you need is a piece of paper, a set of pencils, and your imagination. Yet, like any creative pursuit, pencil drawing requires practice, patience, and a willingness to learn from your errors. In this blog, we will delve into the fascinating world of pencil drawing for beginners, examining some of the most frequent blunders that new artists often make and providing practical solutions for fixing them.
As you embark on your artistic journey, it’s important to remember that every stroke of the pencil, every erasure, and every attempt, no matter how imperfect, is a step closer to becoming a better artist. With a commitment to self-improvement and a keen eye for the challenges that often accompany the early stages of pencil drawing, you can uncover your latent talent and unlock your creative potential. So, let’s explore the common pitfalls and how to surmount them, ensuring your path to becoming a proficient pencil artist is smoother and more fulfilling.
1. Inadequate Planning
Pencil drawing, often hailed as the most approachable form of artistic expression, is an enchanting world where creativity meets the stroke of a pencil. It offers both beginners and seasoned artists the canvas to turn their ideas into tangible art. However, one of the most common mistakes that can hinder your artistic journey from the very beginning is inadequate planning.
Inadequate planning can be likened to setting off on a journey without a map or a clear destination in mind. It often leads to disorganized and messy drawings that lack proportion and harmony. As a beginner, you might be eager to put pencil to paper and see your vision come to life, but it’s essential to understand that planning is a pivotal part of the artistic process.
So, why is adequate planning so crucial in the realm of pencil drawing, and how can beginners rectify this common mistake?
The Importance of Planning in Pencil Drawing
- Proportions and Scale: Adequate planning allows you to establish the correct proportions and scale of your subject. It helps you determine the placement and size of various elements in your composition, ensuring that your drawing is visually accurate.
- Composition: Planning helps you arrange the elements of your drawing in a visually pleasing and harmonious way. It allows you to consider the balance, focal points, and overall design of your artwork.
- Detail and Depth: Planning also involves sketching the basic shapes and outlines of your subject. This preliminary sketch acts as a roadmap for adding details and depth to your drawing. It guides you in creating a three-dimensional effect by providing a foundation for shading and highlighting.
How to Fix the Mistake of Inadequate Planning
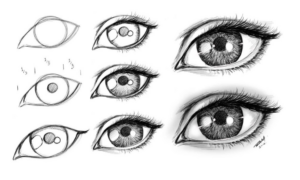
- Sketch a Rough Outline: Start your drawing by sketching a rough outline of your subject. Use light and loose lines to establish the basic shapes and contours. This preliminary sketch is your guide throughout the drawing process.
- Study Your Reference: If you’re drawing from a reference image or object, spend time studying it. Pay attention to the shapes, proportions, and details. This will help you replicate them more accurately in your drawing.
- Measure and Compare: Use techniques like sighting and measuring to ensure that the various elements in your drawing are in the right proportions. You can use a pencil or your thumb to gauge distances and angles accurately.
- Plan Your Composition: Before you start drawing, think about the composition of your artwork. Decide on the placement of your subject and any additional elements. Consider the rule of thirds, leading lines, and other compositional techniques to create a visually appealing result.
2. Using the Wrong Paper
The right paper serves as the foundation for your artwork, affecting how your pencil strokes adhere, how well you can blend and shade, and even how long your drawings will stand the test of time. Understanding the significance of paper choice and how to rectify this common mistake is key for those embarking on their journey in the world of pencil drawing.
The Importance of Choosing the Right Paper
- Texture and Tooth: The texture or tooth of the paper refers to its surface roughness. Papers can range from very smooth to heavily textured. The tooth of the paper influences how well the pencil graphite adheres to the surface and how effectively you can create different textures in your drawings.
- Weight and Thickness: The weight and thickness of the paper determine its sturdiness. Heavier weight paper is more durable and can handle multiple layers of pencil without warping or tearing.
- Erasability: Some papers allow for better erasability, while others can make erasing a challenge. The right paper should allow for adjustments and corrections without damaging the surface.
- Longevity: Archival quality paper is essential for preserving your artwork over time. Using non-archival or acidic paper can lead to yellowing and deterioration of your drawings.
How to Fix the Mistake of Using the Wrong Paper
- Select the Right Type: Choose paper specifically designed for pencil drawing. Look for heavyweight, acid-free paper with a suitable tooth (surface texture). Some popular choices include drawing paper, bristol board, or even watercolor paper. Experiment with different types to find the one that suits your style best.
- Consider the Weight: Pay attention to the weight of the paper. For most pencil drawings, a paper weight of 80 pounds (approximately 120gsm) or higher is recommended. This weight provides the necessary thickness and durability for your drawings.
- Texture Matters: Determine the level of texture you prefer. Smoother papers are excellent for detailed work, while heavier texture can create interesting effects in your drawings. Test different textures to discover your preference.
- Archival Quality: If you wish to preserve your artwork for years to come, invest in acid-free and archival-quality paper. This ensures that your drawings won’t yellow or degrade over time.
- Test and Experiment: Don’t hesitate to try out different types of paper and experiment with your preferred pencils and techniques. Every artist has unique preferences, and you’ll find the paper that works best for your style through experimentation.
3. Overusing Pressure
The Importance of Pressure in Pencil Drawing
- Value Control: The pressure you apply with your pencil determines the value of your lines. Light pressure results in lighter lines, while heavy pressure produces darker lines. This variation in value is crucial for creating contrast and depth in your drawings.
- Detail and Texture: Controlling pressure allows you to create a wide range of textures and details. From soft, feathery strokes to bold, expressive lines, the pressure you apply defines the character of your drawing.
- Layering and Blending: Proper pressure management is essential when layering and blending pencil strokes. It enables you to create smooth transitions between different values and to build up layers of shading effectively.
How to Fix the Mistake of Overusing Pressure
- Lighten Your Grip: The first step in correcting this mistake is to consciously lighten your grip on the pencil. Many beginners tend to hold the pencil tightly out of anxiety or in an attempt to gain more control. However, a relaxed grip will allow for greater control and finesse in your strokes.
- Practice Varying Pressure: Spend time practicing with different levels of pressure. Create value scales by making gradual transitions from light to dark strokes. This exercise will help you become more comfortable with pressure control.
- Use a Range of Pencils: Different pencil grades produce different levels of darkness. Experiment with a range of pencils, from 9H (lightest) to 9B (darkest), to familiarize yourself with their characteristics. This will enable you to select the right pencil for the level of darkness you desire.
- Shading and Blending Techniques: Explore shading and blending techniques to achieve smooth transitions and gradients in your drawings. Techniques such as hatching, cross-hatching, and stippling can help you create different textures and effects without relying solely on pressure.
- Build Up Layers: Instead of pressing harder to achieve a darker line, consider layering multiple strokes. Gradually build up the darkness by adding more layers of pencil. This method not only maintains control but also results in a more nuanced and rich drawing.
4. Neglecting Shading and Blending
The Importance of Shading and Blending
- Creating Depth: Shading adds depth to your drawings by depicting variations in light and shadow. This, in turn, makes your subjects appear three-dimensional and more lifelike.
- Smooth Transitions: Blending helps you achieve smooth transitions between different values and tones, allowing for a more seamless and realistic appearance. It eliminates the visible lines and harsh edges often present in less refined drawings.
- Textural Detail: Shading and blending are essential for depicting different textures and materials. They help convey the tactile quality of the subject, whether it’s the softness of fur, the roughness of bark, or the gleam of metal.
How to Fix the Mistake of Neglecting Shading and Blending
- Use a Range of Pencils: Experiment with various pencil grades, from hard (H) pencils to soft (B) pencils. Hard pencils create lighter lines, while soft pencils produce darker lines. Using this range allows you to capture a broader spectrum of values.
- Hatching and Cross-Hatching: Learn the techniques of hatching and cross-hatching. Hatching involves creating parallel lines to build up value, while cross-hatching uses intersecting lines to achieve darker areas. These techniques are excellent for shading and adding depth.
- Blending Tools: Invest in blending tools like blending stumps, tortillons, or even your fingers. These tools allow you to smooth out pencil strokes, creating seamless transitions between different values.
- Layering: Instead of pressing harder on your pencil, focus on layering. Gradually build up the darkness by adding more layers of pencil. This approach not only maintains control but also results in a smoother and more nuanced drawing.
- Erasable Guidelines: To aid in shading, you can create light, erasable guidelines using a harder pencil grade (e.g., 2H). These guidelines help you establish the direction and form of your shading.
- Practice and Observation: Study real-life subjects, photographs, or other artworks to observe how shading and blending are used to create depth and realism. Practice is key to mastering these techniques.
5. Skipping Reference Materials
The Importance of Reference Materials
- Accuracy: Using a reference ensures the accuracy of your drawing. It provides a real-world or photographic representation of your subject, helping you replicate its features, proportions, and details faithfully.
- Proportion: References help you maintain correct proportions in your artwork. They serve as a guide for sizing and placing elements within your composition, preventing the common problem of distorted or disproportionate drawings.
- Detail: References help you capture intricate details that might be difficult to visualize or remember accurately. Whether it’s the fine lines of a face or the specific texture of a tree’s bark, references provide invaluable information.
- Realism: For artists seeking a realistic style, references are indispensable. They enable you to observe light, shadow, and color as they appear in reality, allowing you to replicate these aspects convincingly in your drawings.
How to Fix the Mistake of Skipping Reference Materials
- Select Your Reference: Choose a reference that best represents your intended subject. It could be a photograph, a live model, or even a still life arrangement. Ensure that your reference is clear and provides the level of detail you need.
- Observe and Analyze: Spend time observing your reference. Pay attention to the specific features, proportions, and details. Take notes if necessary, and study the interplay of light and shadow.
- Measure and Compare: Use techniques like sighting and measuring to ensure that the elements in your drawing match the proportions of your reference. You can use a pencil or your thumb to gauge distances and angles accurately.
- Start with a Sketch: Begin your drawing by lightly sketching the basic shapes and outlines based on your reference. This initial sketch acts as a roadmap for your drawing, ensuring that you maintain the correct proportions and positioning.
- Regularly Refer Back: Continuously refer back to your reference as you work on your drawing. This helps you capture the nuances, details, and lighting accurately.
- Personal Style and Interpretation: While references are crucial for accuracy, remember that you can still inject your personal style and interpretation into your artwork. References are a foundation, not a limitation. They guide you, but you have the creative freedom to make the drawing your own.
6. Ignoring Perspective
The Significance of Perspective
- Realism: Perspective is fundamental for creating realistic drawings. It enables you to depict objects and scenes as they appear in three dimensions, accounting for depth, distance, and scale.
- Proportion and Scale: Perspective helps you maintain accurate proportions and scale within your drawings. It ensures that objects in the foreground appear larger than those in the background, mirroring how we perceive the world.
- Depth and Spatial Relationships: Perspective is crucial for establishing the spatial relationships between objects and elements in your composition. It guides you in depicting the relative positioning of items within a scene.
- Composition: Perspective plays a significant role in composing your drawings. By understanding principles like the horizon line and vanishing points, you can create balanced and harmonious compositions.
How to Fix the Mistake of Ignoring Perspective
- Learn the Basics: Invest time in understanding the fundamentals of perspective drawing. Start with one-point perspective and gradually progress to two-point and three-point perspective as your skills develop.
- Vanishing Points: Identify the vanishing points in your drawing. Vanishing points are the points on the horizon where parallel lines appear to converge. They are essential for creating the illusion of depth.
- Horizon Line: Determine the horizon line in your composition. The horizon line is where the sky meets the ground or any reference line that represents the viewer’s eye level. It’s a critical reference for creating accurate perspective.
- Foreshortening: Practice drawing objects that are foreshortened, meaning they appear shorter or compressed due to their orientation in space. This will help you understand how objects change as they recede into the distance.
- Grids and Guides: Utilize grids or guides to help you establish accurate perspective in your drawings. These aids can be particularly useful for complex architectural or interior scenes.
- Regularly Check Perspective: Continuously assess and adjust the perspective in your drawing as you work. Use the initial sketch to lay out the basic perspective, and then refine it as you add details and elements to your composition.
Learn more about Pencil Drawing for Beginners: Common Mistakes and How to Fix Them…
Certainly, we have another blog related to “Pencil Drawing for Beginners: Common Mistakes and How to Fix Them.” In this second blog, we explore additional common mistakes that beginners often encounter in pencil drawing and provide practical solutions to help you overcome these challenges. Whether you’re just starting your artistic journey or looking to refine your skills, these blogs are valuable resources to guide you toward becoming a proficient pencil artist. Feel free to explore both blogs to gain a comprehensive understanding of the common pitfalls in pencil drawing and how to correct them for more satisfying and rewarding results.
Watch this tutorial to know more about Pencil Drawing for Beginners: Common Mistakes and How to Fix Them:
3 Common Drawing Mistakes & How to Fix Them
Conclusion:
In summary, as you embark on your path to pencil drawing proficiency, remember that mistakes are not roadblocks but opportunities to improve. By addressing these common pitfalls, you will elevate your work, breathe life into your drawings, and unlock the full potential of your artistic expression. Whether you’re a beginner taking your first steps in the world of art or a seasoned artist seeking refinement, these insights into common mistakes and their solutions provide a map for your artistic journey. With each correction, your pencil becomes not just a tool but a magic wand, transforming blank pages into enchanting worlds of creativity and imagination.
Pencil drawing is a skill that takes time and practice to master. Mistakes are a natural part of the learning process, and they offer valuable opportunities for improvement. By recognizing these common mistakes and applying the solutions provided, beginners can enhance their pencil drawing skills and create more satisfying and realistic artwork. Remember, it’s all about practice, patience, and the joy of creating.


