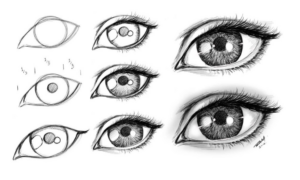
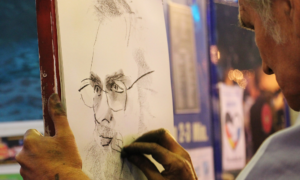
The art of pencil drawing is a captivating form of artistic expression that transcends time and continues to enchant both artists and viewers alike. While lines give form and structure to a drawing, it is the art of shading that breathes life into it, creating the illusion of depth and dimension on a two-dimensional surface. Shading is the subtle interplay of light and shadow, and it is a skill that every pencil artist must master to elevate their work from the ordinary to the extraordinary.
Shading is the technique that allows an artist to manipulate the intensity and direction of light to craft an illusion of depth, volume, and realism on paper. With the deft touch of a pencil, an artist can transport the observer into a world of intricate textures, dramatic contrasts, and captivating three-dimensionality. Whether you’re sketching a portrait, a still life, a landscape, or even fantastical worlds from your imagination, shading is the key to unlocking the secrets of visual storytelling.
At its core, shading is an exercise in understanding the play of light and shadow on objects in the real world. It involves keen observation of how light falls on various surfaces, the reflections it creates, and the intricate interplay between highlights, midtones, and shadows. By capturing these nuances in pencil, an artist can evoke not just the likeness of a subject but also its character, emotion, and, most importantly, the illusion of it occupying a tangible space.
The journey into the world of shading is an exploration of contrasts. It’s about wielding the pencil to create gentle gradations, sharp edges, soft transitions, and bold contrasts. It’s about discovering how the slightest changes in pencil pressure can drastically alter the mood and form of a drawing. It’s about mastering the art of creating depth on a flat canvas, making objects seem to pop off the page, and inviting the viewer to reach out and touch the art.
In this exploration, we will delve into the essential techniques, tools, and principles that govern the art of shading. From understanding the fundamentals of light and shadow to the careful manipulation of pencil strokes, we will journey together to demystify the complexities of shading. We will learn to appreciate the beauty of contrasts, the harmony of tones, and the precision of detail that bring a drawing to life.
As we embark on this artistic journey, it’s important to remember that the art of shading is not just a skill but a language, a means of conveying depth, emotion, and narrative. It’s an art form that bridges the world of imagination and reality, inviting us to explore the wonders of visual storytelling. So, let’s sharpen our pencils, open our sketchbooks, and embark on a creative odyssey into the art of shading, where we’ll discover the power to transform lines into life.
Understanding Light and Shadow
1. Light Source:
The Role of Light in Art
Light is not merely an external factor; it is an integral character in every artwork. It is the protagonist that dictates the mood, sets the stage, and shapes the narrative. The interplay of light and shadow can evoke a wide range of emotions – from the tranquility of a soft, diffused glow to the intensity of dramatic chiaroscuro. Through thoughtful manipulation of light, an artist can guide the viewer’s gaze, convey the time of day, and even hint at the underlying symbolism of a composition.
Understanding the Light Source
The light source in a drawing or painting is not just a technical consideration; it’s the cornerstone of the entire visual experience. Here are some key concepts to consider:
- Direction of Light: The first and foremost aspect of a light source is its direction. Is the light coming from above, below, or the side? The direction of the light determines where the shadows fall and how objects are illuminated.
- Intensity of Light: The strength of the light source plays a pivotal role in shading. A strong light source creates deep, crisp shadows, while a weaker source results in softer, more subtle shadows.
- Quality of Light: The quality of light refers to whether it is natural (like sunlight or moonlight) or artificial (like a lamp). Natural light changes in color and intensity throughout the day, and understanding this can lend a sense of realism to your artwork.
- Light Angle: The angle of the light source in relation to the subject affects the distribution of highlights, shadows, and midtones. A shallow angle creates longer shadows and adds drama, while a steep angle can reduce the visibility of shadows.
- Multiple Light Sources: In complex scenes, multiple light sources can interact, creating intricate patterns of light and shadow. Artists must consider the influence of each source and how they interact to achieve a cohesive result.
Shading and the Light Source
Shading is essentially the process of accurately representing how light interacts with objects. To shade effectively, an artist must analyze the position of the light source and imagine how it would affect the subject. Here’s how this understanding translates into shading techniques:
- Highlight: The highlight is the brightest part of an object, where the light source directly strikes. It’s often the starting point for shading, as it establishes the source’s position and intensity.
- Core Shadow: The core shadow is the darkest area, usually located on the side opposite the light source. It marks the transition from the illuminated area to the shadowed area.
- Cast Shadow: Objects cast shadows on surfaces behind them, which are also influenced by the light source’s direction. These shadows help anchor objects in space and create a sense of depth.
Artistic Expression through Light
Mastering the art of shading through an understanding of the light source opens the door to endless artistic possibilities. Artists can use light to infuse their creations with depth, emotion, and meaning. The way light interacts with a subject can convey everything from serenity to tension, from hope to despair.
As an artist, your journey through the art of shading and the study of light sources is an exploration of both the technical and emotional aspects of your craft. It’s a powerful tool that allows you to communicate stories and evoke responses, captivating your audience with the magic of light and shadow on canvas or paper. Embrace the light source as a partner in your creative endeavors, and watch as your art comes to life with depth, dimension, and the illumination of the human experience.
2. Highlight:
The Significance of Highlights
Highlights serve as the anchor point for the entire shading process. They are where light makes its initial impact on an object, and as such, they play several crucial roles in the artistic narrative:
- Light Source Identification: The highlight is where the light source is most evident. It allows viewers to discern the direction of the light and its intensity, setting the stage for the overall mood and atmosphere of the artwork.
- Object’s Material and Texture: Highlights reveal the nature of the subject. They differentiate between materials like metal, glass, and fabric, and they can suggest textures, whether smooth, rough, or reflective.
- Depth and Three-Dimensionality: By positioning highlights in the right places, artists can create the illusion of form and volume. They guide the viewer’s eye, leading it across the subject’s surface and creating a sense of depth.
- Emotional Impact: The play of light can evoke various emotions. A well-executed highlight can convey a sense of freshness, purity, or even spirituality, depending on its position and intensity.
Creating Effective Highlights
Achieving convincing highlights requires a deep understanding of light and meticulous execution. Here are some techniques and tips to help you create effective highlights:
- Observation: The foundation of effective highlight creation is careful observation. Study how light interacts with objects in the real world. Look for highlights on various surfaces and materials, noting their characteristics.
- Light Source Analysis: Analyze the light source in your artwork. Identify its direction and angle relative to the subject. Understanding the source’s position is vital for accurate highlight placement.
- Pencil Pressure: To create highlights, use a light touch with your pencil. Leave areas untouched or apply minimal pressure to let the white of the paper shine through. Experiment with different pencil grades to achieve the desired intensity.
- Blending: Use blending tools like blending stumps, tortillons, or even your finger to smoothen the transition from the highlight to the midtones. This softens the edges and makes the highlight appear more natural.
- Reflective Surfaces: When working with highly reflective surfaces, such as glass or water, pay attention to how highlights bend and distort. These reflections add depth and realism to your artwork.
- Multiple Light Sources: If your artwork involves multiple light sources, consider how they interact and create overlapping highlights. This can result in intricate, visually engaging effects.
Artistic Freedom and Expression
While mastering the creation of highlights is essential for realism, it’s also a realm of artistic freedom and expression. Artists can manipulate highlights to emphasize certain areas, suggest emotions, or even create fantastical worlds. The placement, intensity, and shape of highlights allow artists to shape the narrative and imbue their work with a unique visual language.
As an artist, embracing the challenge of working with highlights is to embrace the very essence of shading. Highlights are where your creativity and your technical skill meet, where you infuse your art with life, and where you invite your viewers to engage with your visual stories. In the art of shading, highlights are the sparks that ignite the magic of light and shadow, revealing the beauty and depth of the world around us.
3. Core Shadow
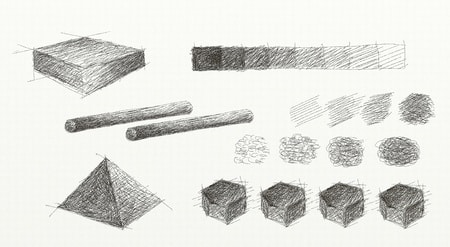
The Significance of the Core Shadow
The core shadow is a powerful element in shading, with several significant roles to play:
- Defining Form: The core shadow defines the three-dimensional form of an object. It gives shape and structure to the subject, suggesting volume, weight, and substance.
- Separating Light and Shadow: It acts as the visual boundary that separates the illuminated region from the shadowed area. This distinction is vital for conveying depth and realism.
- Creating Contrast: The core shadow often exhibits the highest contrast between light and dark in a drawing or painting. This contrast adds drama and visual interest, drawing the viewer’s eye.
- Depth and Dimension: By properly rendering the core shadow, artists can convey the idea that the object exists in a three-dimensional space, making it appear solid and tangible.
Shading Techniques for Core Shadows
Achieving convincing core shadows requires a keen understanding of light and form, as well as careful execution. Here are some techniques and tips to help you master the art of shading the core shadow:
- Pencil Pressure: Apply moderate to heavy pressure with your pencil to create the darkest parts of the core shadow. The core shadow should be darker than the midtones but not as dark as the cast shadow.
- Edge Control: Pay attention to the edges of the core shadow. These edges are not as sharp as those of the cast shadow but are softer, with subtle transitions. Use hatching, cross-hatching, or blending to achieve these transitions.
- Reflections: In some cases, you may notice slight reflections within the core shadow. For instance, a surface might bounce some light back into the shadow. These reflections add realism and complexity to your shading.
- Multiple Light Sources: If your artwork involves more than one light source, you might have multiple core shadows. Consider how these shadows interact and overlap, creating intriguing effects.
The Art of Shading
1. Start with a Basic Sketch:
The Importance of a Basic Sketch
The basic sketch serves as the guiding framework for your artwork, ensuring that proportions, composition, and overall structure are in harmony. But its significance goes beyond mere technicalities; it’s the first opportunity to express your artistic vision and bring your ideas to life. Here’s why a basic sketch is indispensable in the art of shading:
- Proportion and Composition: A well-executed basic sketch helps you establish the correct proportions of your subject and determines its placement on the page. It allows you to plan the composition, ensuring that your artwork is visually appealing and balanced.
- Understanding Form: During the sketching process, you begin to comprehend the three-dimensional form of your subject. You identify the primary shapes, contours, and volumes, which are essential for shading realistically.
- Initial Shading Guidelines: While sketching, you can outline areas of highlights, midtones, and shadows. This step acts as a roadmap for your shading process, indicating where light and shadow will interact on your subject.
- Artistic Vision: The sketching phase is where you first interpret your subject through your unique perspective. It allows you to add your artistic flair and personal style, setting the tone for the entire piece.
Techniques for Starting with a Basic Sketch
- Light, Loose Lines: Begin with light, loose lines that are easy to adjust and erase. Use a hard pencil, such as 2H, to create your initial sketch. This allows for easy modifications without leaving prominent marks.
- Proportional Guidelines: Use simple geometric shapes and construction lines to establish proportions and angles. These guidelines can help you accurately place facial features, objects, or landscapes.
- Break Down Complex Forms: For complex subjects, break them down into simpler forms, like cylinders, cubes, and spheres. Gradually build up the details from these basic shapes.
- Use Reference Material: Reference images or objects can be invaluable when creating your basic sketch. They provide visual guidance and help you accurately depict intricate details and nuances.
- Erase and Refine: Don’t be afraid to make adjustments and refinements as you progress. Erasing and redrawing are part of the sketching process and contribute to the final outcome.
2. Vary Your Pencil Pressure:
The Significance of Varying Pencil Pressure
Pencil pressure is the force you apply to your pencil as it interacts with the paper. Varying this pressure is a fundamental skill for artists practicing the art of shading, and it holds profound importance in the following ways:
- Value Control: Varying pencil pressure allows you to control the darkness or lightness of your marks, creating a spectrum of values. This is crucial for representing highlights, midtones, and shadows in your drawings.
- Dimension and Depth: By adjusting pressure, you can convey the three-dimensional form of your subject. Light pressure yields lighter areas (highlights), while heavy pressure results in darker regions (shadows). This creates the illusion of depth.
- Texture and Detail: Varying pressure is instrumental in rendering texture and fine details. It enables you to depict intricate patterns, such as the grain of wood, the softness of fabric, or the ruggedness of rocks.
- Expressive Emphasis: Skillful modulation of pencil pressure allows you to emphasize focal points and evoke emotion in your artwork. Light, delicate lines can convey fragility or subtlety, while bold, heavy strokes can express strength and intensity.
Techniques for Varying Pencil Pressure
- Experiment with Pencil Grades: Different pencil grades, ranging from hard (H) to soft (B), allow you to create a wide range of values. H pencils produce lighter marks, while B pencils create darker ones. Experiment with various grades to understand their characteristics and how they can contribute to your shading.
- Practice Gradations: To create smooth transitions from light to dark, practice gradations. Start with light pressure, gradually increase it, and then decrease it to achieve a seamless shift in value. This technique is particularly useful for realistic shading.
- Cross-Hatching and Hatching: Cross-hatching and hatching are techniques where you use parallel or intersecting lines to build up values. Vary the spacing and direction of these lines to control the pressure and achieve different tones.
- Blending Tools: Use blending tools like blending stumps, tortillons, or your fingertip to smooth and blend the pencil marks. Blending helps create soft transitions and reduces the appearance of individual strokes.
- Layering: Layering involves applying multiple passes of pencil strokes with varying pressure. This builds up rich, nuanced tones and allows you to explore the full tonal range in your artwork.
3. Use Different Pencils:
The Role of Different Pencils
Pencils are graded according to their hardness and softness, typically indicated on the barrel with a combination of letters and numbers. Understanding the distinctions between these grades and knowing when to employ them is crucial for effective shading. Here’s why different pencils are integral to the art of shading:
- Value Range: Pencils cover a broad range of values, from the very light (9H, 8H) to the extremely dark (9B, 8B). This variety allows artists to achieve the full spectrum of tones, from subtle highlights to rich shadows.
- Texture and Detail: Hard pencils (H grades) are excellent for creating fine lines, intricate details, and subtle texture. In contrast, soft pencils (B grades) are ideal for producing broad, bold strokes and expressive textures.
- Depth and Dimension: Soft pencils are exceptional for building up darker areas and enhancing contrast, while hard pencils are useful for precise, light lines and delicate shading transitions.
- Layering: The range of pencils allows for layering, enabling artists to add depth and complexity to their drawings. Layering different pencil grades creates a rich tapestry of tones that gives the illusion of three-dimensional form.
Using Different Pencils Effectively
- Select the Right Pencil: Begin by selecting the appropriate pencil grade for the specific area of your drawing. Start with a hard pencil (H or HB) for lighter areas and gradually switch to softer pencils (B or 2B) for darker tones. Experiment to find the right balance for your artwork.
- Layer for Depth: To build depth, layer different pencil grades. Start with a light pencil, gradually increase pressure or switch to a softer pencil for darker areas. This layering technique creates smooth transitions and enhances the illusion of depth.
- Vary Line Weight: Experiment with line weight by altering the pressure and angle of your pencil. This can create a variety of textures and patterns, adding interest to your shading.
- Blend with Care: Blending tools like blending stumps or your finger can be used to smooth transitions between pencil marks. However, be cautious not to overblend, as it can result in a loss of texture and detail.
- Consider the Subject: Different subjects may require different pencil strategies. For instance, a portrait may benefit from a wide range of pencil grades to capture subtle skin tones, while a landscape might require a balance between hard and soft pencils for various elements.
Learn more about the art of shading…
If you’re eager to delve even deeper into the captivating world of shading and expand your knowledge of this intricate art form, we have another insightful blog that you won’t want to miss. Our second blog on the art of shading delves into more advanced techniques, shading exercises, and creative applications of shading in various mediums, including charcoal and ink. Discover how shading can transform your artwork and learn from additional expert tips and guidance. To explore this rich source of knowledge, simply navigate to our second blog, “The Art of Shading: Mastering Advanced Techniques and Creative Applications,” and let your shading journey continue to flourish.
Watch this tutorial to know more about the art of shading:
How to Shade Basic Forms – Pencil Tutorial
Conclusion:
The art of shading is a journey that transcends mere technique; it is a gateway to infusing life, depth, and dimension into your pencil drawings. Throughout this exploration of the art of shading, we’ve traversed the realms of light and shadow, highlights and core shadows, and the intricate interplay of pencil pressure and diverse pencils. These are the essential building blocks for achieving the mesmerizing illusion of depth and dimension in your artwork.
Shading, in essence, is the artist’s mastery of manipulating light and shadow to convey the form, texture, and mood of a subject.
Whether you’re sketching a portrait, a still life, a landscape, or even the wildest realms of your imagination, the principles of shading are the unifying threads that bring your art to life. It is through shading that you breathe three-dimensionality into flat surfaces, inviting your viewers to experience the tactile and visual splendor of your creations.

